How Do I Remove Vinyl Lettering from My Trailer?
If you’re asking, “How Do I Remove Vinyl Lettering from My Trailer?” you’ve come to the right place. Over time, vinyl lettering can fade, crack, or simply need to be replaced with new branding. Whether it’s Custom Vinyl Lettering or Custom Trailer Lettering for your business or personal use, the removal process can be completed efficiently with the right tools and techniques. In this blog, we’ll guide you through the steps of removing vinyl lettering without damaging your trailer.
Before you continue, if you are uncomfortable with attempting to remove your Vinyl Lettering without damaging your trailer's finish, please seek out a professional to do this for you. Getting a trailer painted may be even costlier mistake than hiring a professional sign company like RoyGBiv2u.com (407) 494-4233 to remove your old finish.
Tools You Will Need:
- Heat gun or hairdryer
- Plastic scraper or old credit card
- Adhesive remover (such as Goo Gone or rubbing alcohol)
- Microfiber cloths or soft towels
- Soap and water
Step-by-Step Guide to Removing Vinyl Lettering
1. Heat the Vinyl
Start by applying heat to the Custom Vehicle Lettering using a heat gun or hairdryer. Keep the heat source moving to evenly warm the vinyl, softening the adhesive underneath. The heat helps make the lettering more pliable, allowing for easier removal. Be careful not to overheat the vinyl, as this could damage the trailer's surface.
2. Peel Off the Vinyl
Once the vinyl has been heated, use a plastic scraper or old credit card to gently lift the edges of the vinyl. Peel the Custom Vinyl Lettering slowly, keeping a consistent angle as you pull to avoid tearing the material. If the lettering begins to tear or resists coming off, reapply heat to the stubborn areas and continue peeling.
3. Remove the Adhesive Residue
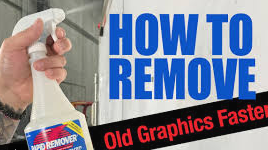
After successfully removing the Custom Trailer Lettering, you’ll likely be left with some adhesive residue. Apply an adhesive remover, such as Goo Gone or rubbing alcohol, to a soft cloth, and gently rub the remaining adhesive until it’s completely removed. Avoid using harsh chemicals or abrasive scrubbing tools to protect the paint on your trailer.
4. Clean the Surface
Once the adhesive is removed, clean the surface with soap and water to remove any leftover adhesive remover and dirt. Use a microfiber cloth to dry the surface thoroughly. Your trailer is now ready for new Custom Vehicle Lettering or any other graphics you’d like to apply.
Extra Tips for Vinyl Lettering Removal:
- Warm Weather is Your Friend: Removing vinyl is easier in warmer conditions as the heat helps to soften the adhesive. Consider working in a warm environment or on a sunny day.
- Plastic Tools Only: Metal scrapers can damage your trailer’s surface. Stick to plastic scrapers or even an old credit card for best results.
- Patience Pays Off: Take your time when peeling off the vinyl. Rushing the process can lead to damaged surfaces or small pieces of vinyl left behind.
Let RoyGBiv2u.com Handle Your Vinyl Lettering Removal
Now that you know the steps, you're no longer asking, “How Do I Remove Vinyl Lettering from My Trailer?” However, if you'd rather leave the job to professionals, RoyGBiv2u.com is here to help. We specialize in Custom Vinyl Lettering, Custom Trailer Lettering, and Custom Vehicle Lettering removal, ensuring a clean and flawless finish without damaging your trailer.
Contact us today, (407) 494-4233, to let RoyGBiv2u.com handle your vinyl lettering removal project and get your trailer looking fresh and ready for its next adventure!


